OMMA | Metrc Starting Package Inventory for Flower and Seeds
Written by Amanda Drapes on Apr 27, 2021
When OMMA and Metrc state that they will require everything on-hand to be entered in Metrc by April 30th, they mean everything, including the dry weights and seeds you have tucked in your storage room. Whether you have claimed it through your monthly reporting previously or not, it must all be claimed and reported in Metrc by end of the month.
Now, generally, when working with Metrc, the only way to create a package of dry weight would be from a harvest batch. However, since those harvest weights/batches do not exist for your post-harvest product, there is what they call an "open source" or "from thin air" process accessible, but again, this open source is set to close on May 1st. By following this guide for ALL packages on hand you will be one step closer to complete compliance!
Parts of this training have been borrowed from the Mertc Beginning Inventory Manual for accuracy
Creating Beginning Inventory Packages | Oklahoma
IMPORTANT: There are FOUR steps that must be executed in order complete the package creation process. Make sure you complete all three steps for all product/packages on hand.
Before you start creating packages, you will need to make sure you have package tags on hand and have created the strains, items, and zones required to create packages. If you have not done this yet, make sure to check out these blog posts on how to order and receive/populate tags as well as create strains and items. GroLens users can sync their strains and zones to Metrc through their compliance dashboard once they have completed the steps to connect their accounts:
Ordering and Receiving Tags
Creating and Adding Strains in Metrc
Creating Items in Metrc
Step 1 of 4 | Creating an External Transfer
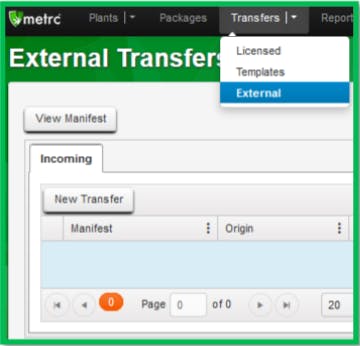
- While in Metrc go to your navigation bar and click the dropdown for Transfers then select “External”
- Click Incoming > New Transfer to populate the External Transfer creation view
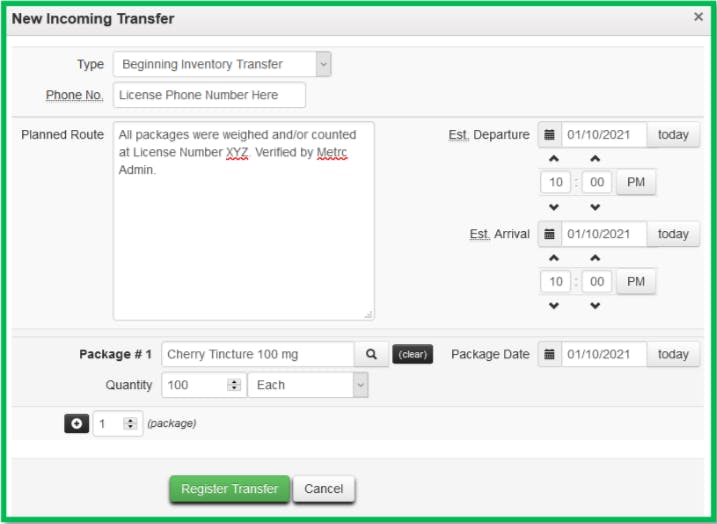
Type: Select the Beginning Inventory Transfer option from the dropdown menu.
Phone Number: Enter a valid phone number. This can be designated as the business phone number.
Planned Route: This can be stated as “Received and weighed at the Licensed Business Number”.
Item Name, Quantity, and Packaged Date: These fields correspond to the specific items and quantities being transferred. The date packaged should be the day that you are entering the items into Metrc. The quantities should be exact and should account only for the product being received.
**Reminder** Creating a pending incoming transfer from Step 1 does not immediately associate Metrc package tags with those items. Without completing the transfer, a licensee will not show the proper inventory and will not be in compliance with inventory reconciliation requirements. Please complete all 4 steps to complete the process
Step 2 of 4 | Receiving/Accepting the Transfer
NOTE: Licensees MUST have package tags available to complete this step.
In this step you will accept the complete the transfer by accepting external transfer created, assigning individual package tags to each individual package. Once you have created your transfer you should still be on the Incoming tab of the External Transfers page:
- Click “Complete” to the far right of the transfer line item to populate the Incoming Transfer detail box
Details and quantities entered during Step 1/External Transfer Creation should auto-populate, but be sure to always confirm the accuracy of the quantities before accepting any packages. - Click on the field next to Package #1 and your available package tags will appear. Select the next tag on the list.
- Enter the Quantity and Date
- Repeat steps 2 and 3 for all packages then click Complete Transfer
Once you have clicked Complete Transfer, all packages you created in your External Transfer will populate in your Active Packages view. To get there click Packages > Active
Step 3 of 4 | Adding Test Results to your Packages
For any packages that have previously been tested, cultivators and processors will add the testing information to the packages by attaching a Note to each package tested. Businesses will be allowed to transfer those packages for a limited time without the test results requiring full entry into Metrc by a licensed laboratory.
- Open your Metrc Active Packages view by going to Packages > Active
- Right-click to bulk select all packages that have already been tested/need to have testing results added to them
- Click Change Notes from the action bar at the top of the package list
- Input a note indicating the following information
Testing Lab Name
Sample ID
Harvest / Production Batch ID
Please Note: If you have multiple packages that came from the same original batch, you can use the template at the top of the popup to apply the note across all selected/added packages - Click Change Notes to apply the notes
Step 4 of 4 | Apply Physical Tags to Packages
To apply the physical tags properly and efficiently, we would suggest printing out your packages list so you can take it on the go with you marking the packages off as you apply the tags. To print your list just click the small printer icon at the top right of your package list. Make sure that any tags with multiple packages in them (1/8ths, 1/4ths etc) are placed to a container/package that contains ALL the weight of that Metrc package. A few things to note about packages:
- Packages can be merged, adjusted, split, and repackaged from the Packages dashboard
- Package weights must be reconciled every 60 days
- Package items/categories and strains should always match what is in the package
Find more great reference articles on Metrc, GroLens and the Cannabis industry here.